Crafting a Scalable and Maintainable Architecture for Node.js and Express.js Web Applications

I am a Full Stack Developer, specialising in React/NodeJS. I have extensive experience in developing and deploying websites utilizing various open-source packages as well as Content Management Systems (CMS) such as WordPress. In addition, I have extensive experience in HTML, CSS, JavaScript, and various open-source frameworks such as NodeJS, ExpressJS, ReactJS, MongoDB. I am skilled in the use of these frameworks to develop web applications based on Single Page Applications (SPA) architectures. I also possess skills in writing complex SQL queries using popular database servers such as MySQL. In addition to my development work, I am skilled in troubleshooting problems and resolving bugs within an existing system.
In this article, we will discuss how to architect a Node.js application properly and why it is important. Additionally, we’ll explore the design decisions that can lead us to create a successful digital product. Whether you are building a new Node.js application from scratch, looking to refactor your existing application, or simply want to explore Node.js application architecture and learn about best practices and patterns, this article will assist you.
Why should you read this post?
Many blog posts on the internet cover the subject of architecting Node.js projects, but few provide an in-depth explanation. While some articles may delve into specific topics like layered architecture, they often fail to illustrate how all the elements come together in a cohesive application. This gap is what inspired me to write this article. I've endeavored to research and consolidate all the necessary information into one digestible piece, sparing you the need to search through multiple sources.
In this article, we'll not only explore how to properly architect a Node.js application but also delve into the rationale behind each design decision. We'll do this by building an actual dummy application, discussing concepts such as folder structure, configuring environment variables, implementing the MVC pattern (Model, View, Controller), employing layered architecture, and encapsulating configurations.
We'll start with simple concepts and gradually build upon them. By the end of this article, you'll know how to craft code that you can be proud of.
Excited? 🤩 Let's dive in!
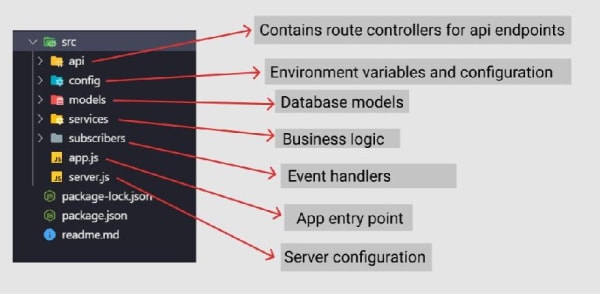
Folder Structure
Organizing code effectively is crucial when developing large-scale projects. A well-defined folder structure not only makes it easy to locate code pieces later but also facilitates collaboration among developers. At my day job, we've developed and refined a folder structure that has proven successful in delivering multiple projects. This structure has been iterated upon through numerous trials and errors, resulting in a system that works seamlessly for us. Feel free to adopt this structure or customize it to suit your specific needs.
Great! Let's start by building our first "Hello World" API endpoint. As we progress through building our sample application, we'll populate the folders in our defined structure with the necessary code logic.
First, let’s take a look at our server.js file
const http = require('http');
const app = require('./app');

const port = process.env.PORT || 3000;

const server = http.createServer(app);

server.listen(port);
Notice that we are requiring our app.js file. We will be writing all our app logic in app.js. It will be our main entry point for the app. Let’s take a quick look at the code.
const express = require('express');
const app = express();

// routes
app.use((req, res, next) => {
    res.status(200).json({
        message: 'Hello world!!!'
    });
});

module.exports = app;
For now, we’ve only added a route in our app.js. The main reason for separating these two files is to encapsulate logic. Let’s take a look at the npm script that I am using to run this application.
"scripts": {
    "dev": "nodemon ./src/server.js"
},
Please make sure that you can run the application by doing npm run dev.
Let’s add resource routes
I bet you are eager to create some more routes. Let’s do that now. We will be creating the following files in our api/routes folder.
api/routes/authors.js
api/routes/books.js
Let’s just return some dummy JSON data from these routes.
/**
 * GET request to /books
 */
router.get('/', (req, res, next) => {
    res.status(200).json({
        message: 'All Books were fetched'
    });
});

/**
 * GET request to /books/:id
 */
router.get('/:id', (req, res, next) => {
    res.status(200).json({
        message: 'Book with id was fetch'
    });
});
You can do something similar for the author routes as well for now. Later in the post, we will be discussing the separation of concerns, and how we can architect our application with a model view controller pattern. Before we do that, let’s cover one other important topic, setting up environment variables.
Configuring our environment variables
As programmers, we frequently underestimate the significance of organizing and configuring environment variables. It's essential for our applications to function seamlessly across various environments, whether it's on a colleague's computer, a server, a Docker container, or a different cloud provider. Therefore, properly setting up environment variables is crucial when architecting a Node.js application.
For this application, I'm utilizing the dotenv library to manage environment variables. First, I installed the library with npm install dotenv --save. Then, I created a .env file in the root directory, where we can add all of our environment variables. Below is a sample setup for my .env file.
PORT=3000
API_URL=https://api.some/endpoint
API_KEY=kkaskdwoopapsdowo
MONGO_URL=
It is a good practice to gather our variables from .env the file and map them into well-named variables and export them through a module. Let’s create a file config/index.js.
const dotenv = require('dotenv');
dotenv.config();
module.exports = {
  endpoint: process.env.API_URL,
  masterKey: process.env.API_KEY,
  port: process.env.PORT
};
The main reason for doing this is to manage our environment variables in one place. For some reason, we may decide to have multiple .env files. For instance, we may decide to have a separate .env for deployment with docker. We may also have other configuration variables. We would like to manage these variables efficiently that’s why we are following this convention.
Alright, now let’s see how we can import these variables into server.js
const http = require('http');
const app = require('./app');
const { port } = require('./config');

const server = http.createServer(app);

server.listen(port);
We have set up our environment variables. Let’s dive into the model-view-controller pattern now.
Model-View-Controller Pattern
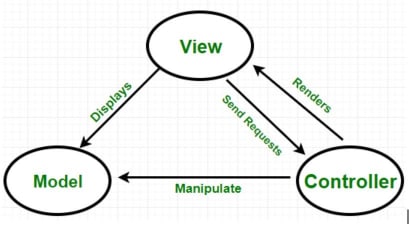
Modern web applications are big and complex. To reduce complexity we use the Separation of responsibility principle (SRP). Using SRP ensures loose coupling, maintainability, and testability. MVC pattern embodies this philosophy of separation of responsibility. Let’s take a look at the different parts of MVC.
Model:
Model components are responsible for managing the application’s data domain. They handle storing, retrieving, and updating data from the database.
View:
The view is the user interface of our application. In many modern web applications, the traditional view layer is often replaced by a single-page application framework such as React.js or Angular.
Controllers:
Controllers manage user interaction. They communicate with models to retrieve information and handle user requests. In smaller applications, controllers may also contain business logic. However, this practice is discouraged for larger applications; we'll delve into layered architecture later in this article to explain why.
Now, let's explore how we can integrate this pattern into our application. For this demo, I'll be using MongoDB as our database. I've created a new controller and model to implement this pattern. First, let's examine the author's model.
const mongoose = require('mongoose');
const authorSchema = mongoose.Schema({
    _id: mongoose.Schema.Types.ObjectId,
    name: { type: String, required: true },
    books: { type: Object, required: false }
});
module.exports = mongoose.model('Author', authorSchema);
We are defining our database-related schemas in the model as well. The controllers will deal with all the fetching and business logic for now. So let’s take a look at the controller.
module.exports = {
    createAuthor: async (name) => {
        const author = new Author({
            _id: new mongoose.Types.ObjectId(),
            name: name
        });
        try {
            const newAuthorEntry = await author.save()
            return newAuthorEntry;
        } catch (error) {
            throw error
        }
    },

    getAuthor: async (id) => {
        // ..
    },

    getAllAuthors: async() => {
        // ...
    }
}
Now we can slim down our router as follows:
/**
 * POST create /author
 */
router.post("/", async (req, res, next) => {
    const author = await authorController.createAuthor(req.body.name)
    res.status(201).json({
        message: "Created successfully",
        author
    })
});
Using this pattern separates our concerns and keeps the code clean, organized and testable. Our components are now following the single responsibility principle. For instance, our routes are only responsible for returning a response; controllers handle most of the business logic and models take care of the data layer.
Look at the code below, for instance:
createAuthor: async (name) => {
        const author = new Author({
            _id: new mongoose.Types.ObjectId(),
            name: name
        });
        try {
            // cehck if author is best-seller
            const isBestSeller = await axios.get('some_third_part_url');
            // if best seller do we have that book in our store
            if(isBestSeller) {
                // Run Additional Database query to figure our
                //...
                //if not send library admin and email
                //...
                // other logic and such
            }
            const newAuthorEntry = await author.save()
            return newAuthorEntry;
        } catch (error) {
            throw error
        }
},
Now, this controller becomes responsible for doing multiple actions, this makes it harder to test, messy, and it is breaking the Single Responsibility Principle.
How do we solve this problem? With the layered architecture!
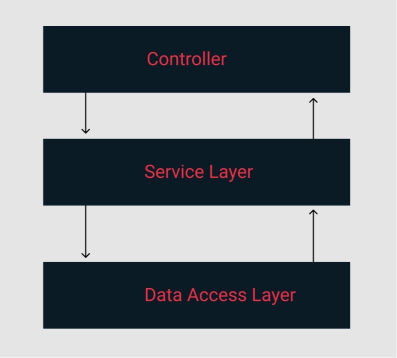
Layered Architecture for Node.js
We aim to apply the principle of separation of concerns by extracting our business logic from our controllers. We'll create small service functions that will be invoked from our controllers. Each service will handle only one specific task, ensuring that our business logic is encapsulated. By doing so, if future requirements change, we'll only need to modify specific service functions, thus preventing cascading effects throughout the application. With layered architecture, we construct applications that are agile and accommodate changes easily when needed. This architecture, often referred to as a 3-layer architecture, fosters maintainability and scalability.
Here's a visual breakdown of our approach:
Alright so let’s break down our previous controller to use this architecture. To start, we will need to create services to handle specific events.
createAuthor: async (name) => {
        const author = new Author({
            _id: new mongoose.Types.ObjectId(),
            name: name
        });
        try {
            await AuthorService.checkauthorSalesStatus();
            await BookService.checkAvailableBooksByAuthor(name);
            const newAuthorEntry = await author.save();
            return newAuthorEntry;
        } catch (error) {
            throw error
        }
},
Notice that service functions are designed to do one specific task. This way, our services are encapsulated, testable, and open to future changes without any major side effects.
Encapsulating Configurations
We write a fair amount of configuration code in our Node.js application. These usually run when the application boots up. It is good practice to have these encapsulated inside a function. This will allow us to track these files better and debug them if necessary.
Let’s elaborate on this with an example. Below we have our app.js file
const express = require('express');
const app = express();
const mongoose = require('mongoose');
const { mongoUrl } = require('./config');
const bodyParser = require('body-parser');

//routes
const authorsRoutes = require('./api/routes/authors');
const booksRoutes = require('./api/routes/books');

mongoose.connect(mongoUrl, { useNewUrlParser: true });
mongoose.Promise = global.Promise;

app.use(bodyParser.urlencoded({ extended: false }));
app.use(bodyParser.json());

app.use((req, res, next) => {
    res.header("Access-Control-Allow-Origin", "*");
    res.header(
      "Access-Control-Allow-Headers",
      "Origin, X-Requested-With, Content-Type, Accept, Authorization"
    );
    if (req.method === "OPTIONS") {
      res.header("Access-Control-Allow-Methods", "PUT, POST, PATCH, DELETE, GET");
      return res.status(200).json({});
    }
    next();
});

app.use('/authors', authorsRoutes);
app.use('/books', booksRoutes);

module.exports = app;
We have a couple of things that are just configuration code. For instance, database connection, body parser, and cors setup are all server configuration code. We can move them into their own separate functions inside config folder.
const mongoose = require('mongoose');
const { mongoUrl } = require('./index');

module.exports = {
    initializeDB: async () => {
        mongoose.connect(mongoUrl, { useNewUrlParser: true });
        mongoose.Promise = global.Promise;
    },

    cors: async (req, res, next) => {
        res.header("Access-Control-Allow-Origin", "*");
        res.header(
        "Access-Control-Allow-Headers",
        "Origin, X-Requested-With, Content-Type, Accept, Authorization"
        );
        if (req.method === "OPTIONS") {
        res.header("Access-Control-Allow-Methods", "PUT, POST, PATCH, DELETE, GET");
        return res.status(200).json({});
        }
        next();
    }
}
And now we can use those functions in our app.js
const express = require('express');
const app = express();
const bodyParser = require('body-parser');
const config = require('./config/init')

//routes
const authorsRoutes = require('./api/routes/authors');
const booksRoutes = require('./api/routes/books');


app.use(bodyParser.urlencoded({ extended: false }));
app.use(bodyParser.json());

app.use(config.cors);

app.use('/authors', authorsRoutes);
app.use('/books', booksRoutes);

module.exports = app;
And that’s it. Our app.js is now looking much cleaner.
Finally, here are the key points to keep in mind for a Node.js project architecture:
Apply proper folder structure: It allows us to easily locate files and code. Also enables better collaboration with the team;
Configuring environment variables: Configure and manage environment variables properly to avoid deployment;
MVC pattern (Model, View, Controller): Apply MVC pattern to decouple, testable, and maintainable code;
Layered Architecture: Apply layered architecture to separate your concerns. Use services extensively to encapsulate your business logic;
Encapsulating Configurations: Separate configuration code from application logic.
We've covered the fundamental concepts of Node.js project architecture in this article. I trust that it has provided valuable insights into how you can architect your own projects. Your feedback on this blog post would be greatly appreciated. Feel free to share your thoughts in the comments section. If you found this article helpful and informative, please consider liking and sharing it. Until next time, happy coding!